mardi 25 mars 2014

Conseils d'entraînement en athlétisme

Je m'étais promis de faire ce blog bilingue et je viens de réaliser que j'ai un billet du mois de février qui n'a pas été traduit! Donc voici sans plus tarder les conseils d'entraînement en athlétisme version française!

Au mois de mai prochain, je serai à Toronto pour quelques jours avec mon équipe d'athlétisme pour le Grand Prix des Écoles Secondaires. Avant de promouvoir l'évènement, ils ont demandé à tous les entraîneurs d'écrire 5 petits conseils d'entraînement. Voici ce que les entraîneurs de Jean de la Mennais ont à vous conseiller.


  1. La posture est un des aspect les plus important de la course. Elle permet aux muscles de travailler efficacement dans leur position optimale, elle permet aux forces d'être distribuées sur les bonnes structure pour absorber et ensuite être redirigées. Elle permet également aux côtes de prendre l'expansion nécessaire et donc d'avoir une bonne respiration. Pour travailler sur la posture, essayez la corde à danser pendant l'échauffement ou les éducatifs comme le skip A avec les bras par dessus la tête. Vous pouvez aussi demander à vos athlètes de s'appuyer debout au mur en gardant les talons, le sacrum, le milieu du dos et l'arrière de la tête coller au mur. Une fois dans cette position, le focus devrait seulement être sur la respiration abdominale profonde.
  2. La saison morte est aussi un bon moment pour travailler sur les aspects moins spécifiques à vos épreuves (par exemple plus d'entraînement aérobie pour les sprinters). C'est également le moment parfait pour incorporer des exercices et de routines de prévention de blessures.Travaillez sur la mobilité de la cheville, des hanches et de la colonne thoracique tout en stabilisant les genoux, le tronc (core) et les omoplates. Préparez une petite routine que les athlètes peuvent faire à la maison à tous les jours de manière à ce que durant la saison leur concentration soit sur les choses importantes comme la vitesse, la puissance et la technique.
  3. Les habiletés neuromuscular (agilité, équilibre, coordination et vitesse) sont les plus importantes et fondamentales pour tous les athlètes. Les travaillez à un jeune âge sera un excellent investissement dans le futur de vos athlètes. Il est également important des les travailler pendant l'adolescence alors que la grandeur, le poids et le ration bras/jambe changent très rapidement. Également n'oubliez pas que vitesse égal effort maximum de moins de 8 secondes, peu importe que vous soyez un sprinter ou un demi-fondeur.
  4. Pour avoir des athlètes qui réussissent, il faut les garder motivés et concentrés. Utiliser du temps de vos entraînement pour du "travail mental" sera très payant. Pour les garder motivés, créez un bon esprit d'équipe,assurez-vous d'avoir un volume et une intensité d'entraînement adéquate et surtout fixez des objectifs en début de saison. Pour la concentration, l'imagerie mentale, les techniques de relaxation des exercices comme l'horloge ou le raisin sont excellents. L'exercice de l'horloge consiste à regarder un horloge et de claquer des doigts à un intervalles donnés (par exemple toutes les 5 secondes). L'exercice du raisin consiste à regarder, sentir et toucher tous les détails du raisin pendant une minute. Ensuite, mettez le raisin dans votre bouche et goûtez le, mastiquez le, sentez le pour un autre minute avant de l'avaler.
  5. Le sommeil et la nutrition sont les deux aspects les plus importants de la récupération. Demandez à une nutrionniste de vous préparer des conseils alimentaires pour le avant, pendant et après les entraînements et compétitions. La nutrition moderne c'est beaucoup plus complexe que de calculer le nombre de calories et de faire des shakes  de protéines.Éduquez vos athlètes sur les bénéfices des choix alimentaires santé.
    Le sommeil est une autre partie de l'entraînement où les athlètes ont besoin d'éducation. Les jeunes athlètes tendent à avoir une temps et une qualité de sommeil inappropriée.Il faut leurs expliquer pourquoi ils devraient laisser l'écran de côté avant d'aller au lit et combien d'heures de sommeil sont nécessaires pour optimiser leurs efforts en entraînement. N'oubliez pas que nous nous améliorons entre les entraînements, pas pendant!
      

Training and Myths About the Core

We often speak of the “core”, but do you know what the core really is? Is it the 6-pack? Is it the transverse? Is it the pelvic floor? Why is it connected to the back? If I always think about bringing my navel (belly button) back, that’s good right? There are many unanswered questions or worse, questions with answers that do not make any sense (“if it worked for my cousin, it should work for me as well”).


First of all, I would like to introduce to you the video that inspired me to write this article. After watching this, maybe you will have a better idea of what the core is! 

Now back on topic...the answer to the first question: the core is a group of muscles that are capable of stabilizing WHILE moving. For example, a sit-up works on my abdominal muscles by moving the trunk, but limbs do not move therefore it is not a core exercise.


So I should do the plank then? It is a little better, but it’s a very static exercise.


Ok so I should kneel (go on my knees), while my upperbody is upright and I do a military press? YES! Excellent!


You see the focus is not necessarily on the trunk or the abs. The best core exercises are the ones that you don’t suspect. For example, the squat, deadlifts, push-ups...

The anatomy of the core: 


The core is composed of two layers, inner and outer. In addition to the two layers, there are the six muscle walls:
  •   Superior: Diaphgram
  •   Inferior: Pelvic Floor
  •  Side: Internal Obliques (inner layer) and external obliques (outer layer)
  •  Anterior: Transversus Adbominis (inner layer) and rectus abdominis (outer layer)
  •  Posterior: Erector spinae as multifidus (inner layer), the thoracolumbar fascia and the quadratus lumborum (outer layer).
 In addition to these many layers, there are also the hip muscles that play a significant role. The hip stabilizers can eventually begin to compensate for the weak muscles of the core. It is important to look at the problem rather than just treat the symptoms (in this case the weak core is the cause and pain that is in the hip).


Exercises : 


The specificity of the core muscles is that they must always be active even for the slightest movements; they are controlled by our subconscious. When you wake up, do you think about activating your multifidus to keep your spine straight? No, I don’t think so! So why is it that when you train the core, you use isolating movements thinking only of this area?

For example, do a sit ups, the least specific core exercise! First, the contraction will isolate the anterior muscles and not activate the posterior chain. Next, the contraction is in motion (concentric) and is therefore not specific to the muscles used when running for example.

I will present to you exercises for the core starting from the simplest to the most complex.

6 to 4 to 3 point support: 

Place yourself on all fours (on your hands and knees), with a stick in contact with the 3 points of support on the back (behind the head, the middle back and the sacrum). The 6 points of support for this exercise are, both hands, both knees and both feet through the toes (see image). To begin, raise both knees above the ground about 5 cm. Ensure that you keep the stick in contact with the 3 points of support. If this position is easy to maintain, move to 3 points of support on the ground by either raising a hand or a foot off of the ground. The important thing here is to maintain good posture while keeping the stick in balance.


Bridge- 4 to 3 points of support:

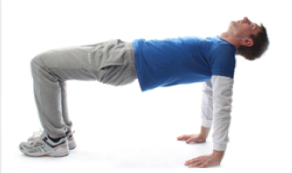
The next exercise asks you to be in an inverted bridge position. Subsequently, the principle is the same as before, keep a straight posture, lift one of the four extremities (either the hand or the foot) off of the ground and then to hold the position while breathing normally.


Half Bridge (Turkish Get- up):

Here is a part of the famous exercise called the Turkish Get-Up.  Here we will be moving towards a position of asymmetric support, therefore making it important to work both sides.  Note that the weight in the hand is optional. Thus, one hand is on the ground, while the other is in the air, however both will be in line. For the legs, the leg that is on the same side as the hand on the ground is in flexion (is bent) while the other leg is in extension (straight). You are to maintain the hips high and the head always facing the hand that is in the air. 


The next four exercises can be done in either of the positions. However, it is important to progress in order before moving on to the next. For example, the anti-rotation press should be carried out in an upright position before moving to the scissors position.

Anti-rotation press (tall-kneeling):

This exercise is done with a pulley or an elastic. You are to kneel on the side of the pulley and then to pull it towards you.  The resistant will lead you to rotate, but you will need to remain straight and upright at all times.  Next, do press-like movements. The challenge of this exercise is to not do the press, but to prevent the rotation.


Chop (half-kneeling):

In this position you begin to create instability which is approaching us from the standing position. Staying on side of the pulley, pull the pulley diagonally and push it downwards.  The trunk should not move, only the arms should be moving. Remember to always stay upright.


Running motion of the arms (standing):

Although it may seem simple, make sure you have made the necessary progress before moving onto this exercise. Maintain an upright and straight posture, normal breathing and move the arms forward and back without too much movement of the hips and trunk.  

Lift (scissor):

The scissor position is shown by the first picture. The lift is the inverse of the chop. Standing on the side of the pulley, you will first lift the arm and then push with the other.


Finally, the last position is on one leg. The exercise demonstrated can only be done in the upright position, in the scissors position and on one leg. The exercise resembles a one leg deadlift which is an excellent stabilization exercise and can be combined with many other movements (there will be another post about this exercise soon!). The first picture will show you the two leg deadlift performed with a stick.  It is important to excel in this exercise before moving onto the one leg deadlift (second image).  It is important to push with the hips and not the knees.  

 So this is what ends this post. Next subject: recovery! Meanwhile don't hesitate to contact me if you have any questions or ideas for a further subject! 


vendredi 21 mars 2014

L'entraînement et mythes sur le core!

On me parle souvent du "core" (la traduction française est l'unité centrale ou les muscles abdominaux profonds...personne ne dit ça alors core ça va faire l'affaire!), mais savez-vous vraiment ce qu'est le core? C'est le 6-pack? C'est le transverse? C'est le plancher pelvien? Pourquoi ça rapport avec le dos? Je dois toujours penser à rentrer mon nombril c'est bon ça? ... ... Toutes ces questions sans réponse ou pire avec des réponses qui ne font pas de sens ("ç'a marché pour mon cousin ça doit marcher pour moi aussi"). 


Donc premièrement j'aimerais vous présenter le vidéo qui m'a inspiré pour cet article. Après avoir vu ça peut-être vous aurez une meilleure idée de la définition du core!

De retour à nos moutons...première réponse : le core c'est les muscles du tronc qui sont capable de stabiliser PENDANT que les membres bougent. Exemple : faire un redressement assis travaille mes muscles du tronc, en bougeant le tronc et les membres ne bougent pas donc ce n'est pas un exercice de core
 

Je fais la planche alors? Un peu mieux mais très statique. 

Ok alors je suis à genou, je me tiens grand et je fais un développé militaire? OUI bravo! 


Vous voyez le focus n'est pas obligatoirement sur le tronc ou les abdos. Les meilleurs exercices de core sont ceux que vous ne suspectez pas. Par exemple le squat, le deadlift, le push-ups...

L'anatomie du core


Le core est composé de deux couches, intérieur et extérieur. En plus des deux couches, il y a les six murs musculaires qui le composent :
·        Supérieur : diaphragme
·        Inférieur : plancher pelvien
·        Latéral : obliques internes (couche intérieur) et obliques externes (couche extérieur)
·        Antérieur : transverse de l’abdomen (couche intérieur) et droit de l’abdomen (couche extérieur)
·        Postérieur : érecteur du rachis comme le multifides (couche intérieur) et le fascia thoraco-lombaire et le carré des lombes (couche extérieur).

En plus de ces nombreuses couches, il y a aussi les muscles de la hanche qui ont un impact important. Les stabilisateurs de la hanche peuvent éventuellement compensé pour une faiblesse des muscles du tronc. Il est important de regarder la cause du problème plutôt que de traiter seulement que les symptômes (dans le cas présent la faiblesse du core est la cause et la douleur sera à la hanche). 


Exercices : 


La particularité des muscles du core c’est qu’ils doivent toujours être moindrement actifs pour tous nos mouvements. Donc ils sont contrôlés par notre subconscient. Quand vous vous levez debout, est-ce que vous pensez à contracter vos multifides pour tenir votre colonne droite? Non je ne pense pas! Alors pourquoi quand vous entraînez le core vous utilisez des mouvements en isolation en pensant qu’à cette région? 

Par exemple faire un redressement assis, l’exercice le moins spécifique au core! Premièrement la contraction isole les muscles antérieurs et n’active aucunement la chaîne postérieure. Ensuite la contraction se fait en mouvement (concentrique) et n’est donc pas spécifique à la demande de ces muscles à la course par exemple.

Je vais donc vous présenter quelques exercices pour le core en partant du plus simple au plus complexe.

6 à 4 à 3 points d’appuis : 

Placez vous à quatre pattes avec un bâton en contact sur les 3 points d’appuis du dos (derrière tête, milieu du dos et sacrum). Les 6 points d’appuis pour l’exercice sont les deux mains, les deux genoux et les deux pieds via les orteils (voir image). Pour commencer, lever les deux genoux du sol d’environ 5 cm. Gardez en tout temps le contact avec les 3 points du bâton. Si cette position est facile à maintenir, passez à 3 points d’appuis au sol soit en levant une main ou un pied du sol. L’important ici est d’être capable de maintenir une bonne posture (en gardant le bâton en équilibre). 


Pont 4 à 3 points : 

Le prochain exercice vous demande d’être en position du pont inversé. Par la suite le principe est le même que le précédant, en gardant une posture droite, levez du sol une des quatre extrémités. Maintenez la position et une respiration normale.


Demi pont (Turkish Get-Up) : 

Voici une partie du fameux exercice Turkish Get-Up. Ici on progresse vers une position en appuis asymétriques, il est donc important de travailler les deux côtés. À noter que le poids dans la main est facultatif. Donc une main au sol, l’autre dans les aires, toutefois les deux sont en ligne. Pour les jambes, celle du côté de la main au sol est pliée alors que l’autre est en extension. Garder les hanches hautes et la tête regarde toujours la main dans les aires.


Les quatre prochains exercices peuvent être fait dans une ou l’autre des positions. Cependant il est important de les maitriser dans l’ordre avant de passer à la suivante. Par exemple, le développé anti-rotation devrait être assimilé en position debout avant de passer à la position ciseaux.

Développé anti-rotation (à genou ou tall kneeling) 

Cet exercice se fait avec une poulie ou un élastique. Il s’agit de se mettre de côté à la poulie et le tirer vers soit. La résistance vous amènera donc à vouloir faire une rotation, vous devez toujours rester droit et grand. Ensuite, faites des mouvements de développés (press). La difficulté ne devrait pas de faire le développé, mais bien de maintenir la rotation.


Chop  (en fente ou half-kneeling) : 

Dans cette position on commence à créer une instabilité qui nous approche de la position debout. De côté à la poulie, tirez en diagonale puis poussez vers le bas. Le tronc ne devrait jamais bouger, seulement que les bras. Pensez à rester toujours grand.


Mouvement des bras de course (debout) : 

Bien qu’il puisse paraître simple, assurez-vous d’avoir fait la progression nécessaire avant de faire cet exercice. Maintenez une posture grande et droite, une respiration normale et faites bouger les bras d’avant à l’arrière sans trop bouger le tronc et les hanches.

Lift (ciseaux) :

La position ciseau est celle démontrée par la première photo. Le lift est l’inverse du chop, de côté à la poulie il faut d’abord lever le bras avant puis ensuite pousser avec l’autre.


Finalement, la dernière position est sur une jambe. L’exercice démontré ne se fait que dans la position debout, ciseaux et une jambe. Il s’agit du deadlift à une jambe qui est un excellent exercice de stabilisation et qui peut être combiné avec plusieurs autres mouvements (un autre billet à venir sur cet exercice !). La première image vous montre le deadlift à deux jambes avec le bâton. Important de bien maîtriser cet exercice afin de le faire à une jambe (deuxième image). L’important et de pousser avec les hanches et non pas avec les genoux.


Voici donc ce qui conclue ce billet. Prochain sujet : la récupération! N'hésitez pas à me contacter si vous avez des idées ou questions!

mardi 18 février 2014

Track training tips

Next May I'm going to Toronto for a few days with my track team for the High School Grand Prix. To promote the event they asked all the coaches to write 5 little training tips. Here what we have at Jean de la Mennais

1.       Posture is one of the most important aspects of running. It ensures that muscles work efficiently in their optimal position, that the forces are distributed on the right structures to absorb and redirect them. It also provides enough space for your ribs to expand and allows an optimal breathing pattern. To work on posture try skipping rope in your warm-up or drills like A skips with arms above your head. You can also ask your athletes to stand against a wall, keeping contact with heels, sacrum, and mid-back and back of the head. Once they are in the correct position, focus on breathing.

2.       Off-season is a good time to work on less specific aspect of your event (e.g.  more aerobic trainings for sprinters). It’s also the perfect time to do injury prevention exercises and routines. Work on mobility of the ankle, hip and thoracic spine while stabilizing the knee, core and shoulder blades. Prepare a little routine they can do at home every day so during the season you can focus on the important things like speed, power and technique.

3.       Neuromuscular skills (agility, balance, coordination, speed) are the most important and basic skills for all your athletes. Working them at a young age will be a good investment in your future athletes. They are also important during adolescence while the athletes height, weight and arms/legs length change a lot and quickly. Also don’t forget that speed is a maximal effort of less than 8 seconds, no matter if you’re a sprinter or a long distance runner.

4.       To have successful athletes you need motivated and focused athletes. Using time of your training for “mental work” will pay off. For motivation create a good team spirit, adequate training volume/intensity and set goals at the beginning of the season. For focus use mental imagery, relaxation technique and drills like the clock or the raisin. The clock drill consists of looking at a clock and to snap your fingers every given time (e.g. 5 seconds). The raisin drill consists of looking, feeling and touching all the details of a raison for 1 minute. After put the raisin in your mouth and taste it, chew it, feel it for another minute before swallowing it.

5.       Sleep and nutrition are the most important aspect of recovery. Ask a nutrionnist to prepare meal advices for before, during and after trainings and meetings. Nutrition is a lot more than calories and proteins shakes! Educate your athletes on the benefits of healthy food choices. Sleeping is another big part where athletes need to be educated. Young athletes tend to have improper sleep time and quality. Explain them why they shouldn’t play with a screen before going to bed and how many hours of sleep they need to optimize their training efforts. Don’t forget, we get better between trainings, not during.  

jeudi 9 janvier 2014

Syndrome fémoro-rotulien - Étude de cas

Voici la première étude de cas du blog. Patient que j'ai traité à l'automne.

Histoire :
Athlète 19 ans collégial
En pleine saison de cross-country (donc augmentation du mileage moyen)
Douleur genou droit (latéral à la rotule) a commencé graduellement au cours des deux derniers mois.
Suivi en physiothérapie (étirements, TENS, ultrasons) sans trop de bénéfice, suspecte ménisque latéral
Pas de blessure marquante dans le passé

Observation :
Technique de course sans défaut évident
Raideurs musculaires générales (lombaires, quadriceps ++)

Évaluation : 
FMS : Overhead squat 2, Lunge 2D 0G, Hurdle 3, Shoulder Mobility 3 Bilat, ASLR 3 Bilat, Push-up 2, Rotary Stability 2.
Apley's Négatif, McMurray Négatif
Rotation interne et externe du genou droit limité
Rotation externe hanche gauche limitée
Rotation interne hanche droite limitée
Bassin : ÉIAS G supérieur, ÉIPS D supérieur, flexion debout positif G, Gossip limité bilat


Conclusions : 
Ménisques normaux du côté D
Iliaque G en rotation postérieur
Syndrome fémoro-rotulien provenant des limitations de rotation de la hanche et de l'articulation tibio-fémorale.

Plan de traitement :
Corriger la rotation iliaque
Rétablir les rotations hanche et tib/fem
Augmenter la stabilité de l'unité centrale
Diminuer le volume d'entraînement assez pour réduire la douleur tout en maintenant le VO2Max

Traitement 1 :
Corrections/relâchements
Muscle energy de l'iliaque G
Mobilisations post-ant du sacrum
Étirements contrac/relax rotation int hanche D et rotation ext hanche G et rotation externe genou D
Mobilisations rotule caudal, latéral et médial (selon restrictions)
Mobilisations tête fibulaire post-ant

Intégration 
Patron FNP D1 membre inf droit (progression passif à actif à résisté)

Exercices à faire

Squat + rotation thoracique
Single leg deadlift

Étirement piriformis (contract-relax)

Mountain climber cycle


Traitement 2 :
2 semaines plus tard
Patient n'a pas eu de douleur au genou pendant la première semaine puis graduellement la douleur est réapparu, mais avec moins d'intensité.

Évaluation
Rotation postérieure iliaque gauche de retour
Hanche droit rotation interne limitée, hanche gauche rotation externe légèrement limitée
Genou droit  rotation externe légèrement limitée, rotation internet limitée

Traitement
Mobilisations post-ant sacrum
Muscle energy de l'iliaque G
Relâchement du piriformis bilatéral
Contract-relax pour rotation interne hanche droite
Relâchement myofascial chaîne postérieure
Mobilisations cheville droite ant-post talus
Décompaction genou droit
Contract-relax pour rotation interne genou droit
Contract-relax quadriceps et fléchisseurs des orteils bilat (beaucoup de tensions)
Patron FNP D1 membre inf droit (progression passif à actif à résisté)

Exercices
Même 4 exercices  +
- Étirement statique des fléchisseurs des orteils
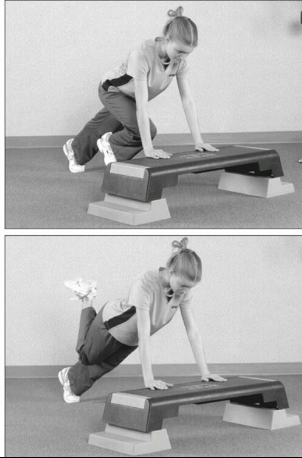
- Quadrupède 6 à 4 à 3 + Rotation hanche (être sur les mains, genoux et orteils, décoller les genoux de quelques pouces du sol (6 à 4) puis déplier une jambe en pleine extension jusqu'à ce qu'elle décolle de quelques pouces du sol (4 à 3). Maintenir la position et faire des rotations actives de la hanche.) Le but de cet exercices et d'activer l'unité centrale et de faire bouger un membre dans son amplitude alors que le centre ne bouge pas, comme ça devrait l'être à la course. J'utilise souvent le bâton sur le dos en contact avec l'occiput, mid-thoracique et sacrum pour assurer une bonne posture.
- Mobilisation cheville : En position debout d'étirements du soléaire avec une ceinture autour des malléoles et attachée à un objet fixe. Aller en dorsiflexion (avancer le genou) mobilisera la cheville.

Traitement 3
1 semaine suivant le précédent
Patient n'a presque plus de douleur. Apparaît très rarement et à faible intensité.

Évaluation
In-line lunge 3 bilat
Rotations hanche légèrement limitée
Rotations genoux normales
Rotation post iliaque présente

Traitement
Même plan que le dernier traitement sans les contract-relax des rotations genou.

Exercices
Mêmes exercices

Suite à ce dernier rendez-vous. Le patient n'a pas eu de douleur à la course. Je le revois fréquemment et se dit très satisfait des traitements, seulement 3 rencontres. Maintenant il continue l'entraînement et tout va pour le mieux!

Messages à retenir:

  1. Syndrome fémoro-rotulien : lâchez le VMO un peu, quand vous aurez des bonnes preuves qu'il est responsable du problème vous me le direz, mais la trop souvent les thérapeutes passent des mois à essayer d'activer/isoler un muscle en position assise ou couchée pour on ne sait pas quelle raison! 
  2. Regardez ailleurs que le genou, la rotule n'est qu'un train dans les rails du fémur, placez le fémur, tibia, bassin à la bonne place et observez ce qui va en suivre. 
  3. Intégrez les mouvements à la fin de chaque séance afin que le corps comprenne et puisse utiliser les nouvelles amplitudes de mouvements que vous lui avez donné.  
  4. Si le patient peut continuer son activité, faites le continuer! Cessez au complet l'activité va rendre son processus de retour au jeu encore plus long. De plus, vous voulez enlever les douleurs à la course, pas au repos. S'il ne coure pas comment aller vous faire pour savoir si ce que vous faites fonctionne?
Voilà suffit pour aujourd'hui!


samedi 4 janvier 2014

Preventing common injuries in HS athletes

Even though it would be pretentious to say that all injuries can be prevented, it is easier to do in track than in a sport such as football because the environment is much more controlled. The movements are more repetitive and the chance of being tackled is much less! Nevertheless, we know that a faulty movement pattern will eventually create micro-trauma that will lead to pain, cessation of the activity, long rehab process, anger, sadness, and no personal bests (to say the least). As a coach, a major problem is the limited knowledge when it comes to injuries and that’s all right - it’s not your job. But here are some tips to keep your athletes… on track!

Screen your athletes

They are many tests out there that claim to prevent injuries. One of the most common and by far my favorite is the Functional Movement Screen (FMS) by Gray Cook. This test is very easy to conduct (approx.7-10 minutes), can be done with large teams (eg: football teams), and almost anyone with knowledge in sports or exercises can learn how to do it. Go get your certification and start screening NOW! Otherwise, ask an athletic trainer or physical therapist to come at the beginning of each season to screen your athletes and give you recommendations.

Another quick and easy test is the Knee Tuck Jump Assessment. This test consists of repetitive knee tuck jumps in 10 seconds where the examiner watches different dysfunctions. More information on this test can be found here.

Old testing session like hamstrings flexibility, maximum push-ups, maximum sit-ups and grip strength are pretty useless when it comes to injuries prevention in track. Running is a movement pattern and we need to see if that movement is functional or not. If it isn’t functional, correct it; if it is, reinforce it.

How many of your athletes have shin splints or knee pain during a season? How many have tried orthoses and stretching to no avail? The problem might not be so superficial.

Have you checked their core stability? Have you asked a specialist to check if their pelvis was properly aligned? What if the answer was that simple? What if months and years of pain could be resolved just by looking at a chain instead of a specific area? To be honest, chronic knee pain almost never comes from the knee. If you don’t have the knowledge to check all of these things, hire someone to do it. It’s a very good investment to see your athletes running instead of doing correctives exercises the week before the nationals!

Flexibility and Stretching

This is a very delicate subject and some people don’t like to hear about it. Here is my opinion based on recent research: static stretching (holding a position for an amount of time) before a power exercise, such as sprinting, may reduce power. That’s why it is suggested to do dynamic stretching (moving through a range of motion).

Having said that, some people NEED to do static stretching before training. Someone recovering from an injury with some muscle tension will benefit from fascial releases and stretching before his or her activity.

Here’s an example of a protocol: Foam roller on the tight muscles for 20-30 little oscillations on the tight point (you know when you press and you start screaming… yes that one!), then stretch that muscle for 30 seconds, and then progress to your drills such as A skips and butt-kicks. This sequence gives the muscle a new range of motion and then allows it to use it for the training.

Convenient isn’t it?

Build a Foundation to Work On

That’s a concept that many coaches already know and use, but what about applying it to prevent injuries? At the beginning of the season, sprinters do more volume to build up their endurance. What about adding an important part of the training on stretching and preventive exercises to make sure everybody is on the same page? You can even do a “yoga-like” routine at the end of training that stretches all the patterns and muscles. Also, get a few foam rollers or sticks that athletes can use before and after.

For strengthening, your screening at the beginning of the season will show you the main issues with your athletes. You can either do a general corrective exercise program for everybody that has a little bit of everything or have your athletes do an individualized program made in relation to their own weaknesses. You can also ask the athlete to do their corrective exercises as part of the warm-up.

For shoes, I suggest wearing minimalist/barefoot shoes for track and for gym trainings. All athletes compete with spikes which are minimalist shoes. You have to make sure your athletes are ready to withstand those forces and more importantly, that their running gait is the same during training as while competing. That will increase your bone density and reduce the chance of stress fracture. If your athletes have been running for a few years in big shoes, make sure to do a slow transition to minimalism.

Posture

A tall and relaxed posture is essential in track. Telling your athletes to stay tall and relaxed is probably not enough. Give them automatic feedback. Teach them how to do a deadlift while holding a hockey stick on their back. The stick should be in contact with the back of your head, mid-spine (between the shoulder blades) and the sacrum. As they move they should always keep those three points of contact.


Jumping rope is also a good exercise to keep a tall posture. You cannot be efficient if you slouch.  Plus it’s a good plyometric exercise and can also work on your anaerobic and aerobic endurance. Vary your position: try on 1 leg, 1 leg in front 1 in the back, etc.

Good posture should be maintained also during resistance training. Avoid machines as much as you can and focus on dumbbells, pulley systems, body weight training etc. Machines will make your stabilizer muscles lazy. Using free weights properly will allow you to train your stabilizers, so you won’t need to rely on a machine for positional feedback.

Medical Questionnaire

Probably one of the easiest parts yet much forgotten! Having your athletes complete a medical questionnaire at the beginning of the season can save you from emergency situations. For example, on a trip for a meet one of your girls begins having difficulty breathing, her tongue is swollen, she has rashes and faints. Unbeknownst to you she was allergic to peanuts and someone had a peanut butter sandwich right next to her. There are so many medical conditions that we are not aware of and your athletes might have one of them. It takes about 5 minutes to complete a questionnaire and can save a life. If the questionnaire comes back clear, then there is nothing to worry about and no harm’s done. If there’s a positive answer then you ask your athletes to get it checked by a physician to clear them for play.

What to do when injuries happen

Here are some quick tips before we go. Anytime you have an acute injury, don’t even ask yourself, "hot or cold?" It’s always cold! Ice helps to decrease metabolism and pain, both of which your athlete will benefit from.

Supportive tapings. Even though these are seen less than in football, some people tend to like taping as a preventive tool. Unfortunately it’s not. Having your ankle taped, for example, will atrophy your muscles, reduce your proprioception, and make you more prone for injuries. Taping should only be used in the return to play phase after an injury and for a brief period of time. This is even more important when working with kids and adolescents who are still growing. The last thing you want to do is create an asymmetry.

Finding a good therapist for your team might be hard when you don’t know what to expect. Have someone with good manual skills, that is knowledgeable about track and field, up to date, is good with exercises prescription (thus original), and cares about your athletes. Some therapists schedule 60 minutes appointments but in fact only spend 15-20 minutes actually treating your athletes. The rest of the time the athletes are plugged to a machine. Unless your therapist is alone for 500 athletes, they should take the time to treat, talk to, consider and educate your athletes.

If your athlete is injured, should he/she runs even if it’s painful? Unlike the usual “No pain, no gain” one of my university professors used to say “No brain, no gain”. Pain is a signal sent to your brain saying something is wrong down there. So the answer is no. If your athlete only has mild pain after training, it might be the beginning of a chronic injury. Give him some time to recover and get it fixed, and if it’s the early stage of an injury, it shouldn’t take long to heal. If the athlete always has pain then it’s more serious. It might take more time to treat, but if you don’t allow the body to recover, it will get worse and instead of having 2-3 weeks of rest it will probably be a few months.

Invest time and money in prevention, it will be worth it. Don’t do any drastic changes. Start incorporating some preventive exercise such as a mobility routine progressively.
Athletes like their routine, don’t rush them.

MAD