We often speak
of the “core”, but do you know what the core really is? Is it the 6-pack? Is it
the transverse? Is it the pelvic floor? Why is it connected to the back? If I
always think about bringing my navel (belly button) back, that’s good right? There
are many unanswered questions or worse, questions with answers that do not make
any sense (“if it worked for my cousin, it should work for me as well”).
First of all, I
would like to introduce to you the video that inspired me to write this
article. After watching this, maybe you will have a better idea of what the
core is!
Now back on
topic...the answer to the first question: the core is a group of muscles that
are capable of stabilizing WHILE moving. For example, a sit-up works on my
abdominal muscles by moving the trunk, but limbs do not move therefore it is
not a core exercise.

So I should do
the plank then? It is a little better, but it’s a very static exercise.

Ok so I should
kneel (go on my knees), while my upperbody is upright and I do a military
press? YES! Excellent!

You see the
focus is not necessarily on the trunk or the abs. The best core exercises are the
ones that you don’t suspect. For example, the squat, deadlifts, push-ups...
The anatomy of the core:
The core is composed of two
layers, inner and outer. In
addition to the two layers,
there are the six muscle walls:
- Superior: Diaphgram
- Inferior: Pelvic Floor
- Side: Internal Obliques (inner layer) and external obliques (outer layer)
- Anterior: Transversus Adbominis (inner layer) and rectus abdominis (outer layer)
- Posterior: Erector spinae as multifidus (inner layer), the thoracolumbar fascia and the quadratus lumborum (outer layer).
In
addition to these many layers, there are also the hip muscles that play a
significant role. The hip stabilizers can eventually begin to compensate for
the weak muscles of the core. It is important to look at the problem rather
than just treat the symptoms (in this case the weak core is the cause and pain
that is in the hip).

Exercises :
The specificity of the core muscles
is that they must always be active even for the slightest
movements; they are controlled by
our subconscious. When you wake up, do you think about activating your multifidus to keep your
spine straight? No, I don’t think so! So why is it that when you train the core,
you use isolating movements thinking only of this area?
For example, do a sit ups, the least
specific core exercise!
First, the contraction will isolate the anterior muscles and not activate the posterior chain. Next, the contraction is in
motion (concentric) and is therefore not specific
to the muscles used when running for
example.
I
will present to you exercises for the core starting from the simplest to the
most complex.
6 to 4 to 3 point support:
Place
yourself on all fours (on your hands and knees), with a stick in contact with
the 3 points of support on the back (behind the head, the middle back and the
sacrum). The 6 points of support for this exercise are, both
hands, both knees and both feet
through the toes (see
image). To begin, raise both knees
above the ground about 5 cm. Ensure
that you keep the stick in contact with the 3 points of support.
If this position is
easy to maintain, move to 3 points of support on the ground by either raising a hand or a
foot off of the ground. The important
thing here is to maintain good posture
while keeping the stick in balance.

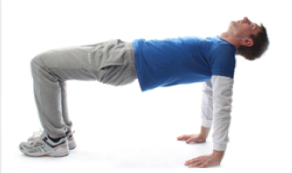
Bridge- 4 to 3 points of support:
The next exercise asks you to be in an inverted bridge position.
Subsequently, the principle is the same as before, keep a straight posture, lift one of the
four extremities (either the hand or the foot) off of the ground and then to
hold the position while breathing normally.
Half
Bridge (Turkish Get- up):
Here is a part of the famous exercise
called the Turkish Get-Up. Here we will
be moving towards a position of asymmetric support, therefore making it
important to work both sides. Note that
the
weight in the hand is optional. Thus, one hand is on the ground, while
the other is in the air, however both will be in line. For
the legs, the leg that is on the same side as the hand on the ground is
in flexion (is bent) while the other leg is in extension (straight). You are to
maintain the hips high and the head always facing the hand that
is in the air.

The next four exercises can be done in either of the positions.
However, it is important to progress in order before moving on to the next. For example, the
anti-rotation press should be carried out in an upright position before moving to
the scissors position.
Anti-rotation press (tall-kneeling):
This exercise is done with a pulley or an elastic.
You are to kneel on the side of the pulley and then to pull it towards you. The resistant will lead you to
rotate, but you will need to remain straight and upright at all times. Next, do press-like movements. The challenge
of this exercise is to not do the press, but to prevent the rotation.

Chop (half-kneeling):
In this position you begin to create instability which
is approaching us from the standing position. Staying on side of the pulley,
pull the pulley diagonally and push it downwards. The trunk should not move, only the arms
should be moving. Remember to always
stay upright.

Running
motion of the arms (standing):
Although it may seem simple, make sure you have
made the necessary progress
before moving onto this exercise.
Maintain an upright and straight posture,
normal breathing and move the arms forward and back without too much
movement of the hips and trunk.
Lift
(scissor):
The scissor position is shown by the
first picture. The lift is the inverse of the chop. Standing on
the side of the pulley, you will first lift the arm and then
push with the other.


Finally, the last position is on one leg.
The exercise demonstrated can only be done in the upright position, in the scissors position and on one
leg. The exercise resembles a one leg deadlift which is an excellent
stabilization exercise and can be combined with many other movements (there
will be another post about this exercise soon!). The first picture will show
you the two leg deadlift performed with a stick. It is important to excel in this exercise
before moving onto the one leg deadlift (second image). It is important to push with the hips and not
the knees.


So this is what ends this post. Next subject: recovery! Meanwhile don't hesitate to contact me if you have any questions or ideas for a further subject!
Aucun commentaire:
Enregistrer un commentaire